
Get started with Versal AI Edge/Prime SOM Development Platform
開梱
箱から開発プラットフォームを取り出し、ESDフリーエリアの上に置きます。静電気防止パッド/マットを使用し、適切に接地して開発プラットフォームを設置してください。また、以下の納品物が物理的な損傷なく受け取られていることを確認してください。
開発キットの内容
- Versal AI Edge/Prime SOM Development Platform
- 12V、5A電源
- 安全ガイドライン
- USBデバッグケーブル
- Allen Key


安全ガイドライン
Versal AI Edge/Prime SOM Development Platform


USBデバッグケーブル
12V、5A電源
Allen key
知る
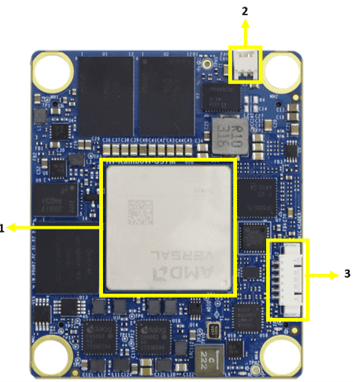
Versal AI Edge/Prime SOM – Top view
- Versal AI Edge/Prime SoC
- Fan connector
3. PMIC Programming Header
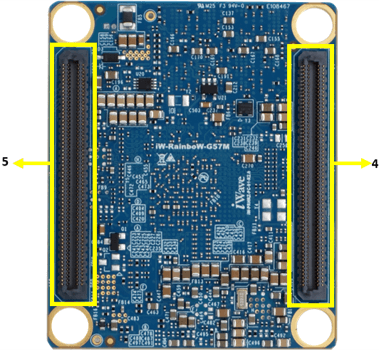
Versal AI Edge/Prime SOM – Bottom view
4. Board to Board connector 1
5. Board to Board connector 2

Versal AI Edge/Prime Development Platform – Top view
1. Board to Board Connector 1
2. Micro SD connector
3. Board to Board Connector 2
4. Power ON/OFF Switch
5. Power IN Connector
6. GEM0 Ethernet Jack
7. GEM1 Ethernet Jack
8. SDI Video OUT
9. SDI Video IN
10. Boot Mode Switch
11. HDMI OUT Connector
12. HDMI IN Connector
13. GPIO Header
14. FMC+ ADJ Voltage Select Switch
15. FMC+ HSPC Connector
16. Reset Button
17. Type-C Debug/JTAG Connector
18. USB2.0 OTG Port

Versal AI Edge/Prime Development Platform – Bottom view
- RTC Battery Holder
20. PMOD Connector
Note: Highlighted connectors are supported by the Versal AI Edge/Prime Development Kit Refer to the Development Kit’s datasheet for more information.
Fan Sink Integration
iW-RainboW-G57D Versal AI Edge/Prime SOMDevelopment platform comes with FanSink attached to it. Make sure to power up the platform only with Fansink attached. Below is the Fansink integration procedure for reference.
- Mount the SOM on to Carrier card
- Peel off the linear present on the Thermal Pad of Fan Sink and make sure SoM mounting holes and Fan Sink mounting holes are properly aligned
- Tighten the screws incrementally as per diagonal sequence mentioned in image
- After assembling make sure thermal pad is contact with SoC
- Connect the Fan Sink housing connector to SOM Fan header as in below image
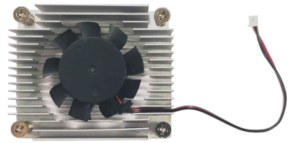

Connect the FanSink to Development Platform
ブートスイッチ設定
Make sure On-Board Switch (SW4) is set properly according to the boot mode selection.

SW4-Boot Switch selection

デバッグポートの設定
The Versal AI Edge/Prime SOM Development Platform has built-in JTAG programming Module.
Both JTAG and Debug UART can be accessed via a single USB Type-C connector (J8).
Connect Type-A end of USB cable to PC and Type-C end of USB cable to Development platform’s
debug USB Type-C connector(J8) as shown below.
Setup the Debug Terminal parameters:
Baud Rate : 115200
Data Bits : 8
Stop Bits : 1
Flow control: None

Install the driver for Debug Port in Host PC/Laptop using the below link.https://ftdichip.com/products/ft232rq/
JTAG接続
iW-RainboW-G57D Versal AI Edge/Prime SOM Development platform support Single Type-C
Connector (J8) for both JTAG programming and Debugging.
In Carrier Board, JTAG-SMT4 Programming module supports both JTAG and Debug functionality.
Please make Sure that SW3 set as OFF for JTAG connection.

電源オン
Connect the 12V Power supply plug to the Power connector (J2) of the Development platform as shown below and Switch ON(SW1) the power supply.
Once power is applied to the Development platform, the D16 – Power Status LED (Red color) will glow and Once FPGA configuration loaded, the D5 – FPGA Configuration Done LED (Green color) will glow in the Development platform as shown in the below image.

警告だ:
- Do not try to connect any other Power Supply other than supplied along with Versal AI Edge/Prime SOM Development Platform.
- Do not plug or remove the Versal AI Edge/Prime SOM from carrier board with live power.
- 電源LEDが点灯しない場合は、iWaveにご連絡ください。
テスト環境のセットアップ
前節で説明したように開発プラットフォームに電源が投入されると、開発プラットフォームに接続されている PC/Laptop のデバッグターミナルにブートメッセージが表示されます。すぐに端末のいずれかのキーを押してブート・ローダーのコマンド・プロンプトを表示するか、OSが起動するまで待ちます。OSが起動すると、デバッグターミナルにログインプロンプトが表示されます。ユーザ名とパスワードを "root "で入力すると、以下のようなLinuxコマンドプロンプトが表示されます。
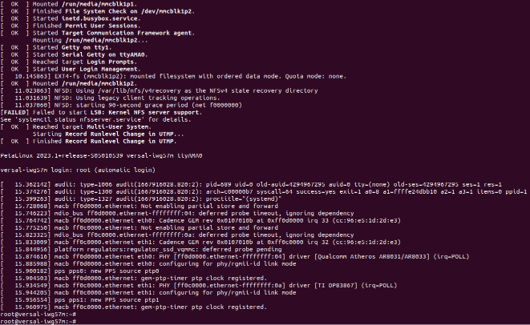
コマンドプロンプト(Linux)