どうすればいいのか?
Get started with Virtex UltraScale+ FPGA SOM Development Platform


ミニコム・チュートリアル
チュートリアル
パテ・チュートリアル
ミニコム・チュートリアル
On the command prompt of the Linux host machine, run the following command to determine the port number:
$ ls /dev/ttyUSB*
ミニコム
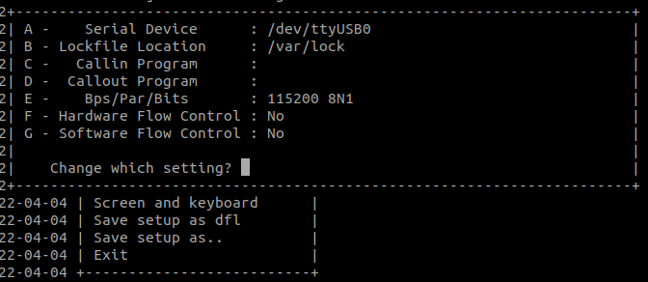
以下のコマンドを使用して、シリアル通信プログラム(例としてminicom)をインストールし、実行する:
- Ubuntuパッケージ・マネージャーを使ってMinicomをインストールする。
sudo apt-get install minicom
- Launch Minicom using a console window using the port number determined earlier.
$ sudo minicom -D /dev/ttyUSB1 - 下図のようにミニコムを設定する。
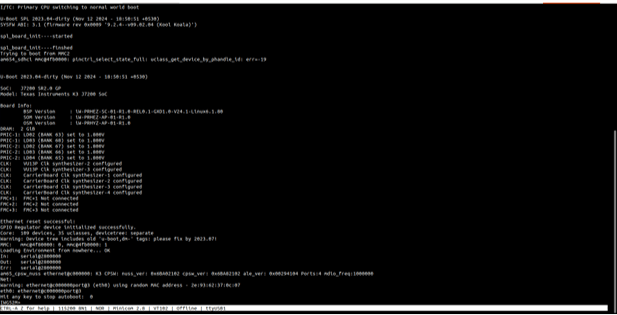
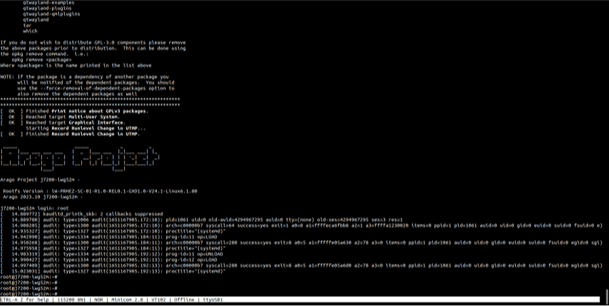
The Virtex UltraScale+ FPGA Development platform is ready to be powered ON.
チュートリアル
http://ftdichip.com/drivers/vcp-drivers/以下のリンクから、ホストPC/ノートPCにデバッグUSBポート用ドライバーをインストールしてください。
- ダウンロード Tera Term and install it.
- Launch Tera Term and power ON the board.
Select the serial option. After your board is plugged in, there should be a COM port automatically populated in the list.
- Launch Tera Term and power ON the board.
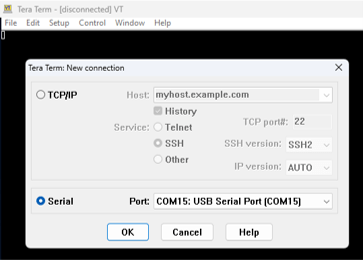
- シリアルポートの設定。
Go to Setup →
Setup the Debug Terminal parameters.
Baud Rate : 115200
Data bits : 8
Parity : None
Stop Bits : 1
Flow Control : None
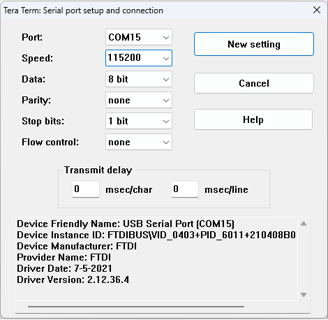
- Verify the title bar in Tera Term to confirm that the connection is established correctly.

パテ・チュートリアル
http://ftdichip.com/drivers/vcp-drivers/以下のリンクから、ホストPC/ノートPCにデバッグUSBポート用ドライバーをインストールしてください。
- Download PuTTY and install the application. webpage to continue.
- Launch PuTTY
- Power ON the board
Enter the appropriate COM port and configure the speed (baudrate) to 115200
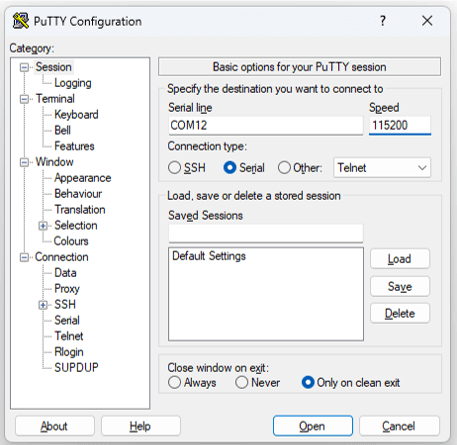
- Click “Open” to open the serial connection.